
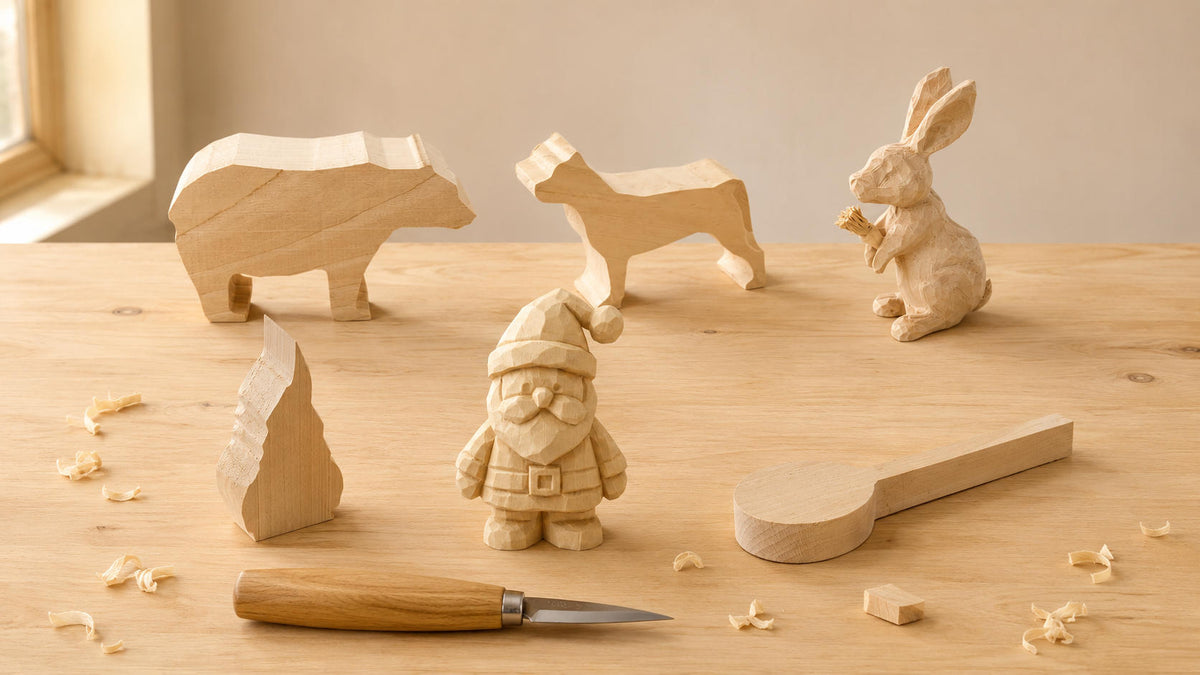
Do you want to start wood carving, but don't know yet how to shape a figure from a simple block of wood? Then pre-formed carving blanks are an ideal way to gain your first experience. The basic shape is already there, and you can concentrate directly on the actual carving work.
Briefly explained: A carving blank is a pre-cut or pre-formed piece of wood. The main proportions of the finished workpiece are already recognizable. This means you don't need a saw for rough cutting and can immediately start working on curves, transitions, and details.
In this guide, you'll learn why carving blanks are particularly suitable for beginners, which motifs are recommended for your first project, and how to carve your own little work of art from a blank step by step.
Table of Contents
- What is a carving blank?
- Why are carving blanks suitable for beginners?
- Why is basswood often used?
- Which motifs are suitable for beginners?
- Ten suitable carving blanks at a glance
- What tools do you need?
- Step-by-step from blank to finished figure
- Safety when carving
- Common beginner mistakes
- FAQ about carving blanks
What is a carving blank?
A carving blank is a piece of wood where the basic shape of the finished workpiece is already defined. Depending on the motif, for example, the body of an animal figure, the shape of a spoon, or the outer contours of a human figure are already clearly recognizable.
However, the blank is not an almost finished product. It merely provides you with guidance. Curves, facial features, fur, clothing, and other details must be worked out by you personally. This leaves ample room for your own ideas and individual design.
Unlike a regular block of wood, you don't have to remove large amounts of wood first. This saves time and makes it easier for you to get started with figure carving.
You can find a large selection in our category Carving Blanks Made of Wood.
Why are carving blanks particularly suitable for beginners?
When free carving from a rectangular block of wood, the proportions must first be drawn and the outer contours worked out. Especially for beginners, it is often difficult to judge where wood can be removed and which areas must remain.
A pre-formed carving blank simplifies this step. The most important shapes and proportions are already present. You can therefore concentrate more on safe tool handling and surface design.
The most important advantages:
- The laborious rough cutting is eliminated.
- The basic shape of the motif is already recognizable.
- You can concentrate on cuts, curves, and details.
- The first visible result appears faster.
- The risk of accidentally removing too much wood is reduced.
- Small irregularities can often be well integrated into the design.
- You don't need a band saw or other large machines to get started.
Quick visible progress is particularly important at the beginning. If a figure or an everyday object is created after a short time, motivation is maintained, and you get a better feel for the material.
Why is basswood often used for carving blanks?
Basswood is one of the most popular carving woods. It has a fine and relatively uniform structure and can be processed in a controlled manner with sharp carving tools. Therefore, it is used by both beginners and experienced carvers.
Advantages of basswood:
- comparatively soft and easy to work
- fine and inconspicuous grain
- well suited for curves and small details
- can be designed natural, painted, waxed or oiled
- ideal for animal figures, human figures and utilitarian objects
Even with easily carvable basswood, a sharp tool is crucial. A dull knife requires more force, can tear out wood fibers, and is less controllable.
Which motifs are suitable for the first carving project?
For your first project, you should choose a motif with a clear basic shape, generous curves, and few delicate areas. Animal figures and simple utilitarian objects are usually easier to realize than realistic faces, hands, or very thin details.
Particularly suitable are:
- compact animal figures like a bear, dog, rabbit, or duck
- simple spoons and smaller utilitarian objects
- figures with clearly recognizable clothing or headwear
- motifs where visible carving marks can be part of the design
It's not just about the shape. Choose a motif that you personally like. You will work more patiently and concentrated on a project that inspires you.
Ten suitable carving blanks for beginners and newcomers
1. Carving Blank "Coffee Spoon"
The "Coffee Spoon" carving blank made of basswood is a small and manageable project. You can practice straight cuts, curves, and smooth transitions with it. In the end, you'll create a practical unique piece that you can use yourself or give as a gift.
2. Carving Blank "Spoon"
The "Spoon" carving blank offers a little more surface for individual design. The handle can be worked smooth, rustic, or with your own pattern. For hollowing out the spoon bowl, you will need a hook knife or a suitable bent gouge.
3. Carving Blank "Bear"
The "Bear" carving blank made of basswood is a good choice for the first larger animal figure. The strong and compact body shape offers sufficient material. Small irregularities are less noticeable with a natural animal motif and can later be designed as fur texture.
4. Carving Blank "Bulldog"
The Bulldog made of basswood is also suitable for beginners with some initial experience. Its compact form makes orientation easier. At the same time, the ears, muzzle, and face offer enough opportunities to give the bulldog its own character.
5. Carving Blank "Rabbit with Carrot"
The "Rabbit with Carrot" carving blank is a friendly animal motif and a beautiful decoration for the whole year. Ears, paws, and carrot can be worked out step by step. Afterwards, you can leave the rabbit natural, oil it, or color it.
6. Carving Blank "Duck with Hat"
The Duck with Hat made of basswood is a humorous carving project with a clearly recognizable basic shape. Beak, hat, and plumage offer many possibilities for individual details and visible carving textures.
7. Carving Blank "Dwarf Beerstrom"
With the "Dwarf Beerstrom" carving blank, you can practice shaping clothing, beard, hat, and face. First, work on the large forms and only carve out the facial features at the very end.
8. Kuksa Carving Blank
The Kuksa carving blank made of basswood is an interesting project for anyone who wants to make a self-carved utensil. With a Kuksa, you can particularly well practice hollowing out, rounding, and creating uniform wall thicknesses.
9. Glasses Holder Blank "Nose"
A particularly original project is the glasses holder blank "Nose". This creates a practical glasses holder and at the same time a decorative unique piece. The surface can be designed smooth, rustic, painted or oiled.
10. Carving Blank "Santa Claus Klaus"
For the Advent season, the "Santa Claus Klaus" carving blank is suitable. Hat, coat, beard, and face offer many possibilities for individual design. Once carved, the Santa Claus is a beautiful decoration or a personal Christmas gift.
What tools do you need for a carving blank?
For most pre-formed blanks, you don't need a large set of tools to start with. More important than the number of knives is that the tools you use are sharp and fit well in your hand.
A sensible basic set consists of:
- a straight carving knife for general carving work
- a smaller knife or gouge for details
- a hook knife for spoons, bowls, and other depressions
- a cut-resistant glove
- sandpaper for surface finishing
- sharpening or stropping accessories for re-sharpening
- a pencil for marking important lines
If you don't have any tools yet, the 17-piece EdpaS carving knife set for beginners offers a comprehensive basic equipment with carving knives, basswood, glove, and accessories.
For spoons, kuksa, and other projects with depressions, the Narex Start Spoon Carving Set is suitable. This set is available for both right-handed and left-handed users.
Step-by-step from blank to finished figure

1. Examine and plan the blank
First, look at the blank from all sides. Consider which areas are already well formed and where wood still needs to be removed. For figures, you can carefully mark eyes, mouth, clothing, or other important lines with a pencil.
2. Check the direction of the wood grain
Pay attention to the direction of the wood fibers. If the knife suddenly cuts deeper into the wood or tears out fibers, you should change the cutting direction.
First, test the grain direction with a small, shallow cut in an inconspicuous spot. This will give you a feel for which direction allows the wood to be worked cleanly.
3. Start with the large shapes
First, work on the large curves and transitions. Always remove only small amounts of wood. Check the workpiece regularly from the front, back, and both sides.
Do not try to finish eyes, fur, beard, or other small details immediately. If the basic proportions still need to be changed later, already worked out details can be lost again.
4. Gradually refine the shape
Once the large proportions are correct, you can separate individual areas more distinctly. For an animal figure, for example, the head, body, legs, and paws are gradually worked out more clearly.
Rotate the blank regularly during work. A figure should appear harmonious not only from the front, but from all angles.
5. Work out details
Now you can design the face, fur, clothing, and embellishments. Use short and controlled cuts. Be especially careful with eyes, ears, fingers, or thin edges.
Do not apply unnecessarily high pressure. Several small cuts are safer and more accurate than a single deep cut.
6. Design the surface
You can deliberately leave visible carving marks. They give the workpiece a hand-carved character. If you want a smoother surface, you can carefully sand the workpiece.
Start with a coarser grit and then switch to a finer one. Small indentations and deliberately carved structures should only be lightly sanded so that the details are preserved.
7. Refine the workpiece
Finally, you can leave your carving project natural, paint it, wax it, or oil it. First, test the desired surface treatment in an inconspicuous area.
For spoons, kuksa, and other objects that come into contact with food, only a surface treatment explicitly suitable and food-safe may be used.
Safety when carving

Carving knives have sharp blades. Careful and controlled work is therefore particularly important. A sharp knife requires less force than a dull tool and is easier to control when used correctly.
Observe these safety rules:
- Always carve away from your body and fingers.
- Never place your free hand in front of the cutting edge.
- Work with short and controlled cuts.
- Do not use damaged or loose tools.
- Ensure good lighting and a stable workspace.
- Store unused knives safely.
- Children and adolescents may only carve under the supervision of an adult.
Additionally, we recommend a suitable cut-resistant carving glove. Such a glove can reduce the risk of cuts, but it does not replace careful tool handling and does not offer complete protection against sharp or pointed blades.
Common mistakes when carving with blanks
Error 1: Removing too much wood at once
A deep cut cannot be undone. Therefore, remove the wood step by step and check the shape regularly from all sides.
Error 2: Working out details too early
If eyes, ears, or clothing are already finished, even though the large proportions are not yet correct, these details may have to be changed again later. Always work from the rough shape to the fine details.
Error 3: Cutting against the grain
An unfavorable cutting direction can tear out fibers and cause small areas to break off. Turn the workpiece or change the cutting direction as soon as the wood can no longer be processed cleanly.
Error 4: Working with dull tools
A dull knife requires more pressure and can slip more easily. Check your tools regularly and resharpen them if necessary.
Error 5: Looking at the blank only from the front
A figure can look good from the front and still be too wide or uneven on the back. Therefore, rotate the blank regularly during work.
Error 6: Comparing the result with a perfect template
Every piece of wood has its own grain, and every hand-carved piece looks a little different. Small deviations and visible carving marks make your project unique.
Which blank is best for your first project?
If you've never carved before, we recommend a clear motif with few delicate details. A coffee spoon, a simple spoon, or a compact animal figure like the bear are particularly suitable.
After your first experiences, you can try a bulldog, a rabbit, or a duck. A kuksa, a dwarf, or a figure with a detailed face then offers an interesting progression.
It's important to take your time. Carving is not about finishing as quickly as possible. The journey from the blank to the finished workpiece is an important part of the creative experience.
Conclusion: Carving blanks make getting started easier
A pre-formed carving blank takes away the difficult rough cutting and allows you to start directly with the creative part of carving. You learn to guide your tool in a controlled manner, to recognize the course of the wood fibers, and to gradually work out shapes.
Your first project doesn't have to be perfect. Small irregularities and visible carving marks give a hand-carved piece its special character.
Discover our basswood carving blanks and find the right motif for your first or next carving project.
FAQ: Frequently Asked Questions about Carving Blanks
What is a carving blank?
A carving blank is a pre-cut or pre-shaped piece of wood. The basic contours of the final workpiece are already present and are then further refined with carving tools.
Are carving blanks suitable for beginners?
Yes. Pre-shaped blanks are particularly suitable for beginners because the difficult rough cutting is eliminated. The existing basic shape makes orientation easier and allows for a quick start to the actual carving work.
Which carving blank is suitable for the first project?
For the first project, a small spoon or a compact animal figure with clear contours is recommended. A coffee spoon, bear, or rabbit offers sufficient material and tolerates minor irregularities.
Which wood is best for carving blanks?
Linden wood is particularly popular because it is relatively soft, fine-grained, and easy to work with uniformly. This makes it suitable for both beginners and experienced carvers.
What tools do I need for a carving blank?
For many blanks, a sharp carving knife, a smaller tool for details, and a cut-resistant glove are sufficient. For spoons, kuksas, or other depressions, a hook knife or a curved gouge is also needed.
Does a carving blank need to be sanded?
No. Visible carving marks can be intentionally preserved, giving the workpiece a hand-carved character. If you want a smooth surface, you can carefully sand the blank after carving.
Can I paint or oil a finished carving blank?
Yes. The finished workpiece can be left natural, painted, waxed, or oiled. For items that come into contact with food, only a surface treatment explicitly suitable and food-safe for this purpose may be used.
Are carving blanks also suitable for children?
Suitable motifs can also be worked on by children under the direct supervision of an adult. However, carving knives are sharp and must never be used unsupervised by children. The child's age, experience, and skill must be taken into account when selecting tools and projects.